Add the Content Editor web part, add below code to it.(remove items which you want to see!!)
<script type="text/javascript">
function CAMOpt(p,wzText,wzAct,wzISrc,wzIAlt,wzISeq,wzDesc)
{
var mo=CMOpt(wzText,wzAct,wzISrc,wzIAlt,wzISeq,wzDesc);
if(!mo)return null;
if(wzText != "View Properties")
if(wzText != "Edit Properties")
if(wzText != "Manage Permissions")
if(wzText != "Edit Document")
if(wzText != "Delete")
if(wzText != "Send To")
if(wzText != "Check Out")
if(wzText != "Version History")
if(wzText != "View Workflow History")
if(wzText != "Schedule Workflows")
if(wzText != "Alert Me")
AChld(p,mo);
return mo;
}
</script>
Monday, September 20, 2010


Monday, October 12, 2009
Turn off the "Powered by: InfoPath Forms Services" logo in Forms Server 2007
Tired of getting rid of default Line and "Powered by: InfoPath Forms Services " display from Form Server 2007!
It's render by "ifsmain.css" from "C:\Program Files\Common Files\Microsoft Shared\Web Server Extensions\12\TEMPLATE\LAYOUTS\INC"

To determine whether the logo is turned on or whether the logo is turned off, run the following SQL script.
stsadm -o getformsserviceproperty -pn AllowBranding
To turn off the logo, run the following SQL script:
stsadm -o setformsserviceproperty -pn AllowBranding -pv false
Incase if you want it back, To turn on the logo, run the following SQL script:
stsadm -o setformsserviceproperty -pn AllowBranding -pv true
It's render by "ifsmain.css" from "C:\Program Files\Common Files\Microsoft Shared\Web Server Extensions\12\TEMPLATE\LAYOUTS\INC"

To determine whether the logo is turned on or whether the logo is turned off, run the following SQL script.
stsadm -o getformsserviceproperty -pn AllowBranding
To turn off the logo, run the following SQL script:
stsadm -o setformsserviceproperty -pn AllowBranding -pv false
Incase if you want it back, To turn on the logo, run the following SQL script:
stsadm -o setformsserviceproperty -pn AllowBranding -pv true
Tuesday, June 30, 2009
Thanks to Lytebox!
In a nutshell Lytebox improved version of Lightbox class that embed media and presents in a rich end user experience. Read more at http://www.huddletogether.com/2007/04/16/lightbox-203-released/
And http://www.dolem.com/lytebox/
Let's get into Share Point Integration:
1. Create a document library which can be used for Centralized sharing purpose.
2. Download Lytebox v3.22 http://www.dolem.com/lytebox/lytebox_v3.22.zip
3. Upload lytebox. Js , lytebox.css & Images into above created document library.
4. I took a power point presentation and converted all the slides into .jpg (Image) files
5. Upload all those Image files into another document library (I called it Help, since I was dealing with help docs to present in a very rich user experience.)
Note: Name the Image files such a way that you can related it back to your slides
Ex: Presentation Name_Slide number ==> Booking Coordinator Instructions_1.jpg
6. Add Content Editor web part.
7. Now Lytebox Includes
<script language="javascript" src="/Documents/Overlay/lytebox.js" type="text/javascript"></script>
<link media="screen" href="/Documents/Overlay/lytebox.css" type="text/css" rel="stylesheet">
8. Now add Images for slide show; we need to use "LYTESHOW" as REL attribute

9. Hit save and exit from the edit mode of the page.
10. End results on the Pages.

11. User Experience after launching the link.
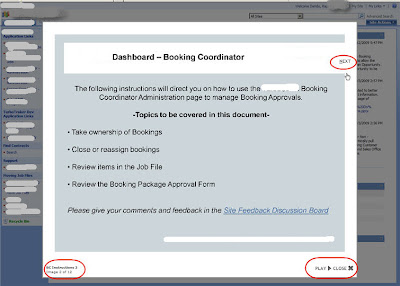
Some other Usage of this great class:
You can have external page displayed as overlay.
1. Add this code (assumption is that you already added step 7)

2. Results on Share Point Page

3. Google Search Results
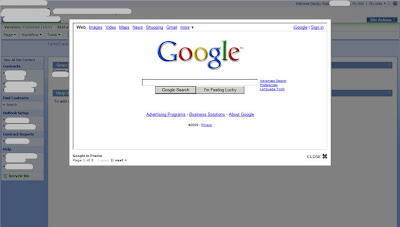
4. Custom Search page.
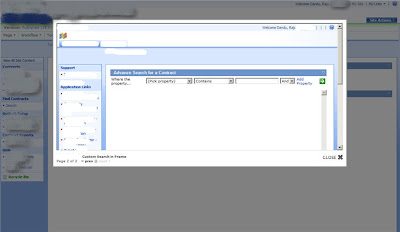
And http://www.dolem.com/lytebox/
Let's get into Share Point Integration:
1. Create a document library which can be used for Centralized sharing purpose.
2. Download Lytebox v3.22 http://www.dolem.com/lytebox/lytebox_v3.22.zip
3. Upload lytebox. Js , lytebox.css & Images into above created document library.
4. I took a power point presentation and converted all the slides into .jpg (Image) files
5. Upload all those Image files into another document library (I called it Help, since I was dealing with help docs to present in a very rich user experience.)
Note: Name the Image files such a way that you can related it back to your slides
Ex: Presentation Name_Slide number ==> Booking Coordinator Instructions_1.jpg
6. Add Content Editor web part.
7. Now Lytebox Includes
<script language="javascript" src="/Documents/Overlay/lytebox.js" type="text/javascript"></script>
<link media="screen" href="/Documents/Overlay/lytebox.css" type="text/css" rel="stylesheet">
8. Now add Images for slide show; we need to use "LYTESHOW" as REL attribute

9. Hit save and exit from the edit mode of the page.
10. End results on the Pages.

11. User Experience after launching the link.

Some other Usage of this great class:
You can have external page displayed as overlay.
1. Add this code (assumption is that you already added step 7)

2. Results on Share Point Page

3. Google Search Results

4. Custom Search page.

Thursday, April 30, 2009
Dynamic Charts for Free!!
Thanks to Google Chart API.
API will return the PNG format image in response to a URL, Advantage! Now you can render several types of images
Including Line charts, Bar charts, Pie charts, Venn diagrams, Scatter plots, Radar charts, Maps ,Google-o-meters & QR codes.
API URL must be in the following format:
http://chart.apis.google.com/chart?&&
Where:
http://chart.apis.google.com/chart? is the Chart API's location.
& separates parameters.
chs=250x100 is the chart's size in pixels.
chd=t:60,40 is the chart's data.
cht=p3 is the chart's type.
chl=HelloWorld is the chart's label.
Results:

Steps:
1. Choose the List
2. Create a Group By View on that List.
3. Now Create a new web part page
4. Add the List to this web part page (Selected List in step 1)
i. Set the current view to Group by new which we created in the step 2
ii. Then Under the Layouts choose/check the Hidden
5. Add the Content Editor web part to the same web part page.
6. Copy below code & you are done!!.
<div id="PieChart" class="content"><strong>Pie Chart Using Google Charting API</strong></div>
<script type="text/javascript">
if(typeof jQuery=="undefined")
{
var jQPath="http://ajax.googleapis.com/ajax/libs/jquery/1.3.2/";
document.write("<script src='",jQPath,"jquery.js' type='text/javascript'><\/script>");
}
</script>
<script type="text/javascript">
$("document").ready(function(){
var arrayList=$("td.ms-gb:contains(':')");
var cord= new Array();
var lblTxt= new Array();
$.each(arrayList, function(i,e)
{
var varIf= $(e).text();
var CordTxt= varIf.substring(varIf.indexOf('(')+1,varIf.length-1); // Extract the 'Y' coordinates
cord[i]=CordTxt;
var LabelTxt= varIf.substring(varIf.indexOf(':')+2,varIf.indexOf("(")-1); // Extract the labels
lblTxt[i]=LabelTxt+"("+CordTxt+")"; //add also coordinates for better read
});
var CordTxt= cord.join(",");
var LabelTxt= lblTxt.join("");
var APIurlWithValues= "<IMG src='http://chart.apis.google.com/chart?cht=p3&chs=750x200&chd=t:"+CordTxt+"&chl="+LabelTxt+"'/>";
$("#PieChart").append("<p>"+APIurlWithValues+"</p>")});
</script>
API will return the PNG format image in response to a URL, Advantage! Now you can render several types of images
Including Line charts, Bar charts, Pie charts, Venn diagrams, Scatter plots, Radar charts, Maps ,Google-o-meters & QR codes.
API URL must be in the following format:
http://chart.apis.google.com/chart?
Where:
http://chart.apis.google.com/chart? is the Chart API's location.
& separates parameters.
chs=250x100 is the chart's size in pixels.
chd=t:60,40 is the chart's data.
cht=p3 is the chart's type.
chl=HelloWorld is the chart's label.
Results:

Steps:
1. Choose the List
2. Create a Group By View on that List.
3. Now Create a new web part page
4. Add the List to this web part page (Selected List in step 1)
i. Set the current view to Group by new which we created in the step 2
ii. Then Under the Layouts choose/check the Hidden
5. Add the Content Editor web part to the same web part page.
6. Copy below code & you are done!!.
<div id="PieChart" class="content"><strong>Pie Chart Using Google Charting API</strong></div>
<script type="text/javascript">
if(typeof jQuery=="undefined")
{
var jQPath="http://ajax.googleapis.com/ajax/libs/jquery/1.3.2/";
document.write("<script src='",jQPath,"jquery.js' type='text/javascript'><\/script>");
}
</script>
<script type="text/javascript">
$("document").ready(function(){
var arrayList=$("td.ms-gb:contains(':')");
var cord= new Array();
var lblTxt= new Array();
$.each(arrayList, function(i,e)
{
var varIf= $(e).text();
var CordTxt= varIf.substring(varIf.indexOf('(')+1,varIf.length-1); // Extract the 'Y' coordinates
cord[i]=CordTxt;
var LabelTxt= varIf.substring(varIf.indexOf(':')+2,varIf.indexOf("(")-1); // Extract the labels
lblTxt[i]=LabelTxt+"("+CordTxt+")"; //add also coordinates for better read
});
var CordTxt= cord.join(",");
var LabelTxt= lblTxt.join("");
var APIurlWithValues= "<IMG src='http://chart.apis.google.com/chart?cht=p3&chs=750x200&chd=t:"+CordTxt+"&chl="+LabelTxt+"'/>";
$("#PieChart").append("<p>"+APIurlWithValues+"</p>")});
</script>
Monday, February 23, 2009
Hide View All Site Content Menu And Site Action Menu
 Some time we need to hide View All Site Content & Site Action Menu from normal user so that they won't mess around.
Add Content Editor webpart, to the page and add below code to it.
<style>
/* TO REMOVE MY SITE LINK */
#ctl00_PlaceHolderGlobalNavigation_ctl08_hlMySite{display:none;}
/* TO REMOVE MY LINKS */
#ctl00_PlaceHolderGlobalNavigation_ctl09_MyLinksMenuMenu_t{display:none;}
/* TO REMOVE SEARCH */
.ms-sbrow{display:none;}
/* TO REMOVE SITE ACTION MENU */
.ms-siteactionsmenu{display:none;}
/* TO REMOVE VIEW All SITE CONTENT MENU */
.ms-quicklaunchheader{display: none;}
/* TO REMOVE RECYCLE BIN */
.ms-recyclebin{display:none;}
</style>
Boom you are done and results:


Hide Whole Master Page:
<style type="text/css">
.ms-globalbreadcrumb{display:none}
.ms-globalTitleArea {display:none}
.ms-bannerframe{display:none}
.ms-titlearealeft{display:none}
.onetidPageTitleAreaTable{display:none}
.ms-quickLaunch{display:none}
.ms-navframe{display:none}
.ms-titlearearight{display:none}
.ms-pagetitleareaframe{display:none}
.ms-pagemargin{display:none}
.ms-bodyareapagemargin{display:none}
.ms-pagebottommarginright{ display:none}
.ms-leftareacell{ display:none}
.ms-pagebottommargin{ display:none}
</style>
Sunday, December 7, 2008
Preserving/Updating CreatedBy and ModifiedBy
You might have a scenario where by you want to migrate the list data from one site another site list manually instead of .STP file
Or you use Run With Elevated Privileges ( with delegate()) to insert a record into library where by normal user don't have contribute rights but only READ access Or you need to update one or more fields in a library and you want to preserve Created By and Modified By data.
Here is the Pseudocode:
If Current User is Super user OR Preserver user details is false
Normal Insert
Else
Run the Code With Elevated Privileges to Insert
Then Restore User Details
End If
Code for Restore User Details (C#):
private void RestoreUserDetails(string sitename, string libname, int itemId, int sharePointUserID, string UserLoginName)
{
using (SPSite siteColl = new SPSite(sitename))
{
using (SPWeb web = siteColl.OpenWeb())
{
SPList Legal = web.Lists[libname];
SPListItem LegalItem = Legal.GetItemById(itemId);
//SPFieldUserValue oUser = new SPFieldUserValue(web, web.CurrentUser.ID, web.CurrentUser.LoginName);
SPFieldUserValue oUser = new SPFieldUserValue(web, sharePointUserID, UserLoginName);
LegalItem["Author"] = oUser.User.ID;
LegalItem["Editor"] = oUser.User.ID;
LegalItem.Update();
}
}
}
Or you use Run With Elevated Privileges ( with delegate()) to insert a record into library where by normal user don't have contribute rights but only READ access Or you need to update one or more fields in a library and you want to preserve Created By and Modified By data.
Here is the Pseudocode:
If Current User is Super user OR Preserver user details is false
Normal Insert
Else
Run the Code With Elevated Privileges to Insert
Then Restore User Details
End If
Code for Restore User Details (C#):
private void RestoreUserDetails(string sitename, string libname, int itemId, int sharePointUserID, string UserLoginName)
{
using (SPSite siteColl = new SPSite(sitename))
{
using (SPWeb web = siteColl.OpenWeb())
{
SPList Legal = web.Lists[libname];
SPListItem LegalItem = Legal.GetItemById(itemId);
//SPFieldUserValue oUser = new SPFieldUserValue(web, web.CurrentUser.ID, web.CurrentUser.LoginName);
SPFieldUserValue oUser = new SPFieldUserValue(web, sharePointUserID, UserLoginName);
LegalItem["Author"] = oUser.User.ID;
LegalItem["Editor"] = oUser.User.ID;
LegalItem.Update();
}
}
}
Tuesday, December 2, 2008
Deactivating the Multiple Documents Option for Upload
We had a business requirement to block the "Upload Multiple Documents" Option for the document library. So add "Content Editor Web Part" check the "Hide" under layouts section.
Then add below code under Source Editor and you are done!.
<script type="text/javascript">
function GetElementByText(tagName, title)
{
var a = document.getElementsByTagName(tagName);
for (var i=0; i < a.length; i++)
{
if (a[i].text)
{
if (a[i].text === title)
{
return a[i];
}
}
}
return null;
}
if (window.onload)
{
var oLoad = window.onload;
window.onload = function bodyLoad()
{
oLoad();
var oMenu = GetElementByText("ie:menuitem","Upload Multiple Documents");
if (oMenu )
{
oMenu .disabled = true;
}
}
}
</script>
Note: If you want to deactivate the Upload Document change the var oMenu ;
var oMenu = GetElementByText("ie:menuitem","Upload Documents");
Then add below code under Source Editor and you are done!.
<script type="text/javascript">
function GetElementByText(tagName, title)
{
var a = document.getElementsByTagName(tagName);
for (var i=0; i < a.length; i++)
{
if (a[i].text)
{
if (a[i].text === title)
{
return a[i];
}
}
}
return null;
}
if (window.onload)
{
var oLoad = window.onload;
window.onload = function bodyLoad()
{
oLoad();
var oMenu = GetElementByText("ie:menuitem","Upload Multiple Documents");
if (oMenu )
{
oMenu .disabled = true;
}
}
}
</script>
Note: If you want to deactivate the Upload Document change the var oMenu ;
var oMenu = GetElementByText("ie:menuitem","Upload Documents");
Subscribe to:
Posts (Atom)